Today I have another really simple diy for you. First you cut a circle in an old shoebox, and divide it into 12 pieces. Instead of using numbers, I used all the I:s from my foam letters pad. Then you attach the hands and the clockwork, as the instructions says, and paint the whole thing gray. (if you want it to look the same as the one I did). All for the cost of 11 euros, or 15 dollars.
April 12, 2013
April 11, 2013
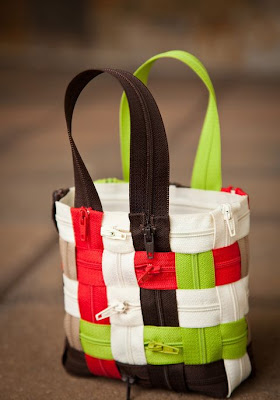
Weave a Zipper Purse
Have you seen the purses and tote bags– usually in airport gift shops– woven out of seat belts? That was the inspiration for this purse woven out of zippers. Create this cute little purse by weaving Coats all-purpose zippers together. Use the colors show or select your own color combination.
Supplies
- Coats All Purpose Zippers, 7”, 14 zippers in a variety of colors
- Coats All Purpose Zippers, 22” 7 zippers for horizontal strips and handles
- Hot glue
- Scissors
- Straight pins
1. Lay out and weave the zippers as the diagram shows flat on a table and pin in place.
2. To form the tote, bring the sides together and pin in place for a temporary hold.
3. Start from the bottom corner and glue the ends together trimming off the ends of zippers as needed and taking care to keep the woven pattern consistent.
4. Once the bottom is woven and glued in place remove the pins from the side seam and starting from the bottom trim the end of each of the zippers as needed and weave in the ends and glue in place with the zipper pull end on the top and the raw edges under a vertical zipper.
5. Wrap the top ends of the raw edges of the vertical zipper over the top horizontal zipper and glue to the inside.
6. Glue the ends of the vertical zippers that are on the inside to the top horizontal zipper.
7. Cut two zippers to approximately 10″ and glue to the underside top edge of the tote.
8. Using the remaining scraps of zippers glue the zippers around the inside parameter of the tote to cover all the raw ends.
For printable instructions, click here: Woven Zipper Purse
April 10, 2013
Crackle Effect - Transparent Facetten-Lack
Attach the napkin design to the wooden icon with decoupage lacquer. A layer of transparent facetten-lack is applied with a spatula. Inka gold creamy metal gloss wax is rubbed into the cracks.
1. Paint the wooden icon with white craft paint.
2. Cut out the design of the napkin and attach it to the wooden icon with decoupage lacquer.
3. Apply a generous 2-4mm layer of the crackle lacquer transparent facetten-lack using a spatula. The crackling will begin after a couple of hours.
4. Rub inka gold creamy metal gloss wax into the cracks with circular movements.
5. Rub off the excess inka gold with a damp cloth. The wax should only be visible in the cracks.


.jpg)


