Showing posts with label Sewing and Knitting. Show all posts

July 07, 2013

Needle Felted Woollen Key Chains and Door Hangers


Woollen objects are felted with carded wool and a felting needle. The A6 needle felting foam pad is ideal for these objects. The more you felt – the firmer the decoration.


1. Place the woollen object on the needle felting mat and arrange the wool on top.


2. Push the felting needle up and down until the wool is securely fastened to the object. The more you felt – the firmer the wool.

Textiles decorated with Fabric Markers and 3D Liner


The key strap, the car sunshades, the pencil case and the purse have all been decorated with colourful designs made with fabric markers and 3D liner.


1. Draw the designs with a black fabric marker.


2. Colour in with colourful fabric markers and decorate further with small dots and lines made with 3D liner. Let it dry. NB: Do not wash in the washing machine.

July 04, 2013

Flax shopping bag with stencil print


Use masking tape to form a square in the middle. Arrange the self-adhesive foil stencils onto the bag and dab on the paint with a sponge. Iron-fix the bag with an iron for 5 min. at high heat. Put a piece of grease proof paper between the fabric and the iron.

April 11, 2013

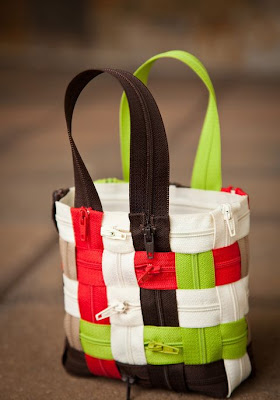
Weave a Zipper Purse

Have you seen the purses and tote bags– usually in airport gift shops– woven out of seat belts? That was the inspiration for this purse woven out of zippers. Create this cute little purse by weaving Coats all-purpose zippers together.  Use the colors show or select your own color combination.

Weave a Zipper Purse

Supplies

- Coats All Purpose Zippers, 7”,  14 zippers in a variety of colors
- Coats All Purpose Zippers, 22”  7 zippers for horizontal strips and handles
- Hot glue
- Scissors
- Straight pins

1. Lay out and weave the zippers as the diagram shows flat on a table and pin in place.


2. To form the tote, bring the sides together and pin in place for a temporary hold.

3. Start from the bottom corner and glue the ends together trimming off the ends of zippers as needed and taking care to keep the woven pattern consistent.


4. Once the bottom is woven and glued in place remove the pins from the side seam and starting from the bottom trim the end of each of the zippers as needed and weave in the ends and glue in place with the zipper pull end on the top and the raw edges under a vertical zipper.


5. Wrap the top ends of the raw edges of the vertical zipper over the top horizontal zipper and glue to the inside.

6. Glue the ends of the vertical zippers that are on the inside to the top horizontal zipper.

7. Cut two zippers to approximately 10″ and glue to the underside top edge of the tote.

8. Using the remaining scraps of zippers glue the zippers around the inside parameter of the tote to cover all the raw ends.

For printable instructions, click here: Woven Zipper Purse

April 10, 2013

Bohemian Shoulder Bag

Bohemian Shoulder Bag

Looking for a fun and practical project for sewers of all levels? This cool-looking bag goes from super simple with plenty of options for embellishment. Enjoy playing with decorative stitches on your machine and splash some color in the process. Walk away (and around!) with a casual bag that shows some serious groove.


March 27, 2013

A Felted Bag for an Ipad


This bag is knitted from wool yarn and then felted in the washing machine at 40°C. Holes are cut after the bag has been felted. The shoulder strap and the fastener are made from 3mm thick leather cords. A handmade horn bead is sewn onto the front.


1. Cast on 50 stitches and knit plain stitches back and forth until the knitted piece measures approx. 85cm. Use yellow yarn for the last 2cm of the knitted piece. Now fold the knitted piece so that the actual bag measures 34cm and the flap measures 17cm. Now sew the bag together inside out and felt it in the washing machine at 40°C. Pull it into shape whilst it is still wet.


2.


3. Gather three pieces of 3mm leather cords in a knot and pull through the knitted piece. Plait the cords until the desired length of the shoulder strap is reached. Close at the other side using the same procedure.


4. Use a piece of mercerised cotton yarn for loosely sewing the horn bead onto the bag.


5. Make a fastener from leather cord as shown.

March 20, 2013

A Black Scarf with colourful Felt Stripes


This black cotton gauze scarf is decorated with long wads of merino wool in different colours which have been placed in width from one side to the other. Then the scarf and the wool is moistened with water, rolled together and felted in the tumble dryer.


1. Cut a piece of lining fabric approx. 20cm larger on all four sides than the cotton gauze scarf and place the scarf on top of the lining fabric. Cut pieces of merino wool the same width as the width of the cotton gauze scarf. Divide each piece nto three or four lengths and place them on top of the the scarf.


2. Place a wet, rolled-up towel at the end of the cotton gauze scarf onto the 20 cm of the lining fabric that sticks out. Moisten the wool with a sprinkler bottle containing warm water.


3. Sprinkle the lining fabric, the cotton gauze scarf and the wads of merino wool with water and roll the whole thing around the wet rolled-up towel in that order as you progress.


4. When all is rolled around the towel, tie pieces of elastic cord around both ends and add another two or three pieces to hold the roll together.


5. Now place the wet roll in the tumble dryer on a normal drying setting for approx. 30 minutes. This process makes the wool felt together – and onto the cotton gauze scarf.


6. Unfold the roll and pull the decorated scarf off the lining fabric. If the wool is not felted onto the scarf, repeat the process of moistening with water, roll togehter and tye together with pieces of elastic cord before putting the whole ensemble back into the tumble dryer.


7. Fill a tub with warm water and dissolve some soap flakes in the water. Rinse the scarf and squeeze the water out.


8. Hit the rolled-up scarf onto the table to get the wool to felt securely onto the scarf and to make the shrinking of the wool just right. Then rinse in three lots of cold water and add a bit of vinegar in the final rinse water to ensure that all the soap is rinsed out. Lay the scarf flat to dry. You may place it on top of a dry towel.

A Shopping Bag with Metallic Stencil Print


This shopping bag is decorated with stencil prints made from uniq pearl paint with a metallic finish. This is a special paint for textiles which has a strong opacity and gives a great effect.


1. Decorate the shopping bag using a foam stencil brush dabbing it with uniq pearl textile paint in different colours. Unleash your imagination and create your own design. Let it dry.


2. When the paint is dry, fix the design with a warm iron.

March 07, 2013

DIY Button Hat


I am happy I don’t have to wear one of those anymore! Those among us, who do (because it’s freezing cold, haha)  read further on how to make this totally awesome button hat! (It’s worth reading anyway, even if you don’t need to wear a hat!)


The only draw back: You need a little bit of patience/time to make it, but it’s so well worth it!

February 03, 2013

A Crinkle Chiffon Scarf


A ready-made chiffon scarf with frills and crinkled surface painted with water-based silk paint.


1. Put the scarf on a piece of polyester wadding and paint with very dilute water and colour blends.


2. When dry, wrap the silk in cotton fabric. Silk should not touch silk. You may wrap the parcel in aluminium foil.


3. Put the parcel onto a stone in a pan with water at the bottom. Place a towel between the pan and the lid to soak up the condensation. Simmer for one hour, rinse and dry.

January 20, 2013

Knitted bag

Knit your own bag with Merino wool.

Quantity:
4 x 100g Merino wool
No. 15 knitting needles

1. The wool comes as a thick sheet of unspun wool. Divide the wool lengthwise into two equally thick threads. Divide each of these again into two equally thick threads and further divide each of these into two equally thick threads. Making a total of eight equally thick threads. When it is time to change the thread, pull out the two wool ends (approx. 5cm), place the ends over each other, work them – if necessary – a bit with your fingers so they are the same thickness as the rest of the thread. The join is now invisible.

2. The bag: Cast on 16 stitches loosely on the knitting needle and knit 25cm in stocking stitch. Cast off loosely and knit another piece. Change colour when desired.

3. The strap: Cast on 4 stitches on the No. 15 knitting needle. Knit back and forth, so one side is plain stitch, i.e. first row right, second row purl, third row right, forth row purl. Continue until the strap is the desired length.

4. Finally sew all the pieces together to make a lovely bag.

January 17, 2013

Cushions with Printed Designs

The cushions are decorated with stencil prints made with textil fabric paint. Refill bottles with a fine tip are filled with textil fabric paint for writing the text.

1. Place a plastic bag inside the cushion prior to painting.

2. Place the stencil on top of the cushion and draw the design in pencil.

3. Draw the design on top of the pencil line using a refill bottle with a fine tip filled with textil fabric paint. Decorate the bird with dots.

4. Make more prints – use your imagination. The black bird is made by dabbing paint onto the stencil using a foam stencil brush.

5. Write text using the refill bottle with a fine tip.

Model 1.

Model 2.

Model 3.

Wrist Warmers with a Nordic Pattern

A gorgeous pair of warm wrist warmers, knitted in Melbourne yarn, 100% Australian deluxe wool.

No. 3 sock knitting needles (for the rib) & No. 4 (for the rest). Wrist warmers: cast on 48 stitches on a No. 3 sock knitting needle and knit 10cm, 2 plain/2 purl (rib).
Change to No. 4 sock knitting needles and knit three rows plain. Now knit following the knitting pattern. Put on a marking thread at the beginning of the row whilst also increasing the number of stitches for the thumb. Knit the first and second row according to the knitting pattern. Begin to increase the number of stitches in the 3rd row for the thumb as follows; knit all the stitches by one, increase by a stitch (gradually knit the new stitches into the pattern). Fourth row: knit a stitch, increase by a stitch in the 2nd stitch after the marking thread and finish knitting this row. Repeat rows 1 to 4 until there are 12 stitches in the “wedge” for the thumb (i.e. six stitches on each side of the marking thread) = 60 stitches in total. Continue knitting until the entire knitted “tube” measures 20cm. Then put the 12 stitches from the “wedge” onto a thread. Cast on two new stitches behind the 12 stitches = 50 stitches in total. Finish knitting following the knitting pattern lengthwise. Now change to No. 3 sock knitting needles and knit 5 rows rib and cast off loosely. The knitted tube now measures 27cm.


The thumb: Put the 12 stitches from the thread onto No. 3 sock knitting needles and knit 4 stitches into the 2 stitches which were cast on behind the “wedge” = 16 stitches in total. Knit one row plain and 4 rows rib and then cast off loosely. Knit another wrist warmer for the other hand following the same pattern.

Attached file: Pattern (289kB)