March 19, 2013

Screen Stencil Prints in Embroidery Frames


The motifs in the embroidery frames are made with textil color fabric paint and screen stencils on tea towels.


1. Place the screen stencil onto the tea towel with the adhesive side face down.


2. Saturate the paint roller with textil color fabric paint. Roll the paint roller onto and over the screen stencil and a print will appear on the tea towel.


3. Remove and wash the screen stencil in lukewarm water immediately. Let the screen stencil print dry for the recommended time stated on the textil color packaging. Then fix the motif with a hot iron on the setting required for cotton (this is normally written on the iron).


4. Draw a circle, approx. 22 cm in diameter with the motif in the center and trim the circle. You may use a pair of compasses.


5. Place the circle with the motif onto the inner ring of the embroidery frame. Press the outer ring down over the inner ring and tighten the tension screw.


6. Trim the edge – all the way around – and hang the embroidery frame using a piece of embroidery yarn.

Easter Decorations made from Metallic Foam Clay


These lovely Easter animals are made from polystyrene balls and eggs covered with foam clay metallic. The ears, wings etc are made from foam clay which has been rolled out flat on a plastic surface, dried, cut and “glued” on with foam clay.


1. Cover a polystyrene ball with foam clay.


2. Roll out a ball of foam clay thinly and let it dry.


3. Roll balls and attach these for legs.


4. Decorate the rabbit.


5. Cut out the ears.


6. Attach the ears with foam clay.

March 18, 2013

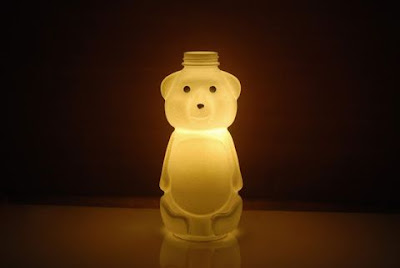
Honey Bear Bottle Lamp

Remember those honey bear bottles that you use during breakfast? I'm going to show you how you can upcycle your bottles into night lamps.


You will need an empty and cleaned honey bear bottle, lightbulb and chord for lightbulb which you can buy at the home depot. My light bulb is a 5 watt warm white compact fluorescent light.


Next cut the bottom part of the bottle using an exacto knife or a plain cutter. The type of plastic is a little harder than the usual PET water bottle so be patient with cutting and be careful not to hurt yourself. I kind of stabbed myself in the hand but it's nothing serious.


Spray 3 coats of white spray paint on the bottle and let it dry. Once it's dry, then place the lightbulb underneath the bottle.


And here's the final product! You can use it as a night lamp for a child's bedroom.


It won't really melt the plastic bottle. I have observed it for a few hours and so far the plastic did not feel warm. The cap portion is open anyway so there's enough space for the warm air to escape.


What do you think? :)