Showing posts with label Decoration. Show all posts

October 03, 2021

Tissue Paper Ghosts with Googly Eyes

Each ghost is made from tissue paper and googly eyes using materials from the Halloween kit. They are then hung from a piece of cotton cord.


1. Cut a 22x22 cm piece of tissue paper for each ghost.


2. Loosely scrunch up a head from cut-offs measuring approx. 2.5 cm, making sure the head is not too heavy to prevent it from tipping over when hanging.


3. Stuff the head inside a large piece of tissue paper, wrap around and tie it tightly with a long piece of cotton cord.


4. Attach eyes with Clear Multi Glue Gel. Make as many ghosts as you like and tie them equal distances apart onto the cord.

A Halloween coffin with spiders

 Decorate a wooden coffin with craft paint and Plus Color markers and use it for decoration for Halloween.


1. Paint the outside and the inside of the coffin with two coats of dark craft paint. Leave to dry between each coat. Cover any metal parts with masking tape.


2. Draw spiders' webs with a Plus Color marker.


3. Attach the spiders with Clear Multi Glue gel.

March 21, 2019

A Chest of Drawers decorated with self-adhesive Film

This small chest of drawers is painted with craft paint. The drawers are then decorated with self-adhesive film.


1. Paint the surfaces and the edges of the chest of drawers with craft paint.


2. Place the front of the drawers on top of the self-adhesive film. Draw around the outline of the front of the drawer and cut out.


3. Attach the self-adhesive film onto the front of the drawers.


March 14, 2019

Fluid Art on a wooden Tray Table made with Pouring-Fluid

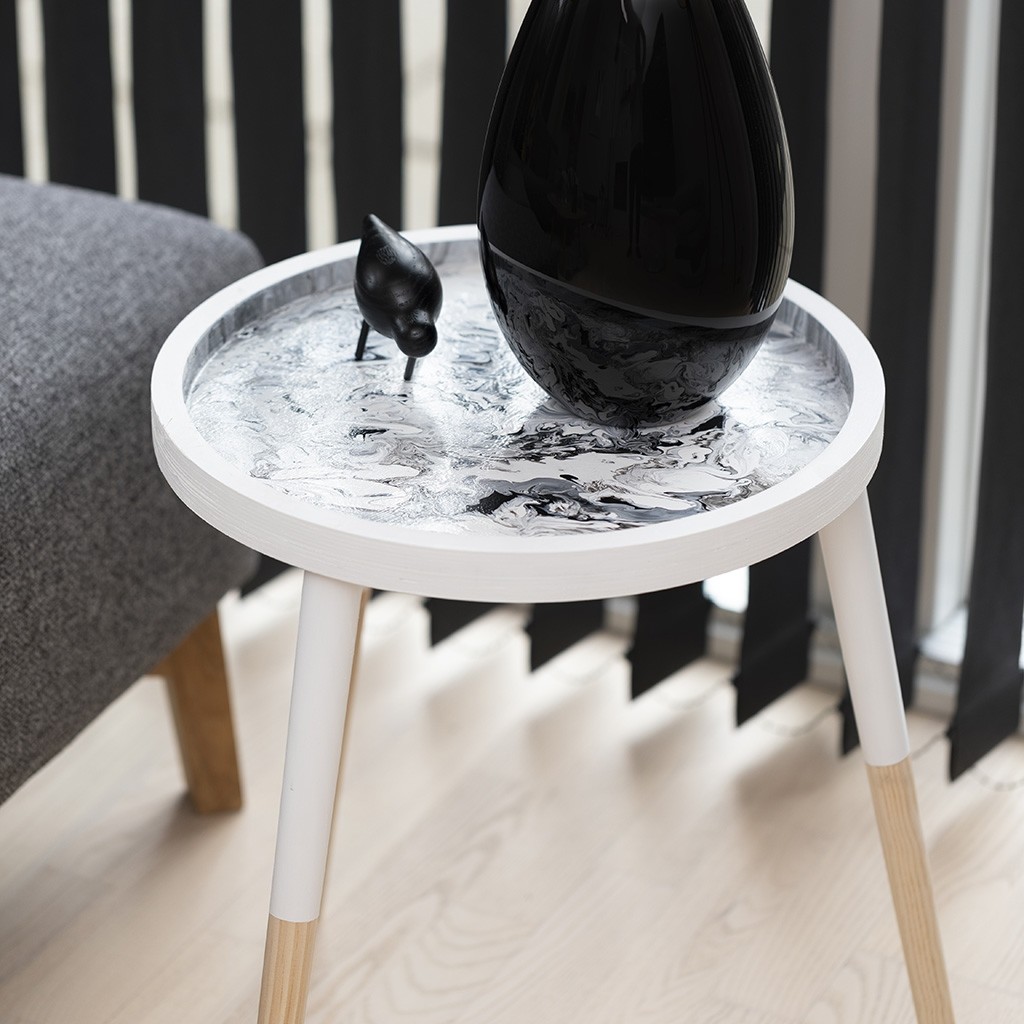
Fluid painting on a small tray table. The tray table is decorated with Pouring-Fluid mixed with craft paint and painted with craft paint.


1. Cover the edge with a narrow strip of masking tape. Pull the masking tape tight and push it onto the edge, ensuring that the paint won't seep underneath the masking tape. Cover around and underneath the base using a wider strip of masking tape.


2. Apply a generous coat of Pouring-Fluid onto the surface of the table and edge using a spatula or a brush to make the paint run smoothly.


3. Mix the Pouring-Fluid with craft paint in a ratio of 1:1. The paint must be very runny. The colour strength won't be diluted when it's mixed with Pouring-Fluid. Pour the first colour around the edge.


4. Immediately pour the second colour in a thinner line.


6. Lift the tray upright and turn it to mix the paint on the inside edge.


7. Pour the first colouronto the inside base of the tray.


8. Pour the second colour on top using a much smaller amount.


9. Lift the tray and turn it so that the colours run into eachother, making a marble pattern. Turn in all directions. The paint must cover the entire surface.


10. Turn the tray upside down to pour off excess paint.


11. Carefully remove the masking tape.


12. Cover the table legs with masking tape 20 cm from the top. Paint using undiluted white craft paint. Preferably apply two coats.


13. Paint the bottom of the table and screw on the legs. Carefully paint the edges. A TIP: the wooden grain rises when it's being painted. Sand between coats for a smooth finish.

March 05, 2019

A Hand cast in Plaster in a disposable Glove


This hand is cast in white plaster compound in a disposable latex glove.


1. Pour water into a bucket and sprinkle plaster compound slowly until it forms a peak at the surface of the water. Leave it for about 8 min.


2. Stir well until air bubbles form on the surface. NB: Plaster generates heat during hardening (the larger the quantity, the greater the heat).


3. Pour the mixture into the disposable glove. A TIP: Ask somebody to help you hold the glove whilst pouring to ease the process.


4. Close the glove with a piece of string, tied tightly.


5. Leave the filled glove to dry on top of a round object in order to get a hollow shape. Leave to dry for approx. 1 hour. Cut away the glove.


Another example with other variants


Another example with other variants

June 27, 2014

A patinated Bottle Holder decorated with a stamped Design


A wooden bottle holder, patinated with craft paint, diluted with water, allowing the grain of the wood to show through the surface. A text and a graphical design are stamped on with undiluted paint in different colours from the same series.


1. Mix craft paint with water in the ratio 1:1 (half and half). Apply the diluted paint onto the bottle holder with a brush and leave to dry.


2. Dab a foam stencil brush in undiluted craft paint. Apply the paint onto the  foam stamp using the foam stencil brush. Now stamp a text and a graphic design according to your own taste – and in different colours. For example, the word “lemonade”.


TIPP: The bottle holder may be used for three milk bottles, each meassuring 550ml.

March 14, 2014

March 06, 2014

Pool Ball Candle Holder

From family game room to chic bachelor pad, this cheeky accessory is sure to have people grinning. It holds ten tealights to create a warm glow in the darkest of man caves.

Pool Ball Candle Holder

Pool Ball Candle Holder

Pool Ball Candle Holder

Pool Ball Candle Holder

November 14, 2013

DIY: Mosaic Ornaments from CDs

There is surely at least one CD you didn’t have any use for, but didn’t quite manage to throw it out. It’s cluttering your desk along other CDs you burned with music, when memory sticks and flash drives were just beginning to catch on. There’s an upside to all this. You can go green – recycle, and make your very own CD mosaic ornaments for the holidays.
Simply take a CD and use a pair of scissors or a cutter to make little pieces out of it that you can glue afterward on a Christmas ball. It’s a fun process and it makes you a friend of the planet and an inspiration for decorators as well.


Video Tutorial:

October 31, 2013