Showing posts with label Jewellery School. Show all posts

January 18, 2013

Jewellery School - Tools for Jewellery Making

In order to make jewellery there are a few special tools which make the work easier and give a good quality result. We have listed the most useful ones.

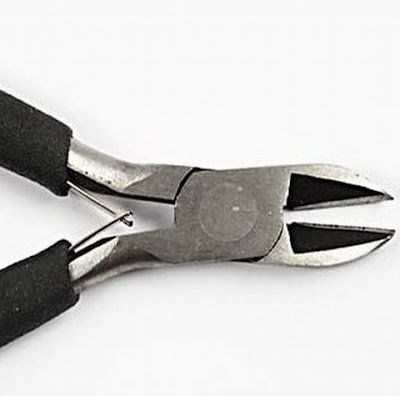
A Side Cutter
A good side cutter is essential. There are many different ones on the market, with end cutters and side cutters. Quite often the one with the side cutter can do the jobs. It can cut up close and is a must when cutting head pins, jewellery chain, metal wire, and beading wire.

Round Nose Pliers
The long, round tip is used for bending wire and head pins. The size of the loop made with round nose pliers depends on which part of the tip is used for shaping the loop. If you want to make several loops all in the same size, you may draw a marker line on the exact part of tip of the round nose pliers.

Chain Round Nose Pliers
These are used for holding, for opening and closing round jump rings.With the thin tip it can get into small areas where there  is not much space. It may also be used for bending head pins and wire. The jaw is flat but round on the outside.

Flat Nose Pliers
May be used for holding, for opening and closing round jump rings. The jaw is flat, like the pliers on the outside.

Bent Nose Pliers
The curved shape and long tip allows you to get to where it is otherwise not easy. Can hold, open and close round jump rings. The jaw is flat, but the pliers are round on the outside and can therefore be used for bending head pins and wire.

Crimping Pliers
This tool can make the closing with crimp beads smaller than when using flat nose pliers. They may also be used for putting in the cut-off end neatly when making a coil from wire or from a head pin.

Nylon Jaw Pliers
This tool is suitable for squeezing jewellery components without scratching them. When working with soft or shiny jewellery components, this tool is indispensable. It is also suitable for straightening bent metal wire  Squeeze hard with the nylon jaw around the wire and pull the wire through the jaw.

A Bead Reamer
This is a special battery operated machine for cleaning and adjusting the bead holes. Hold the bead and the tip of the reamer in some water, and sand off any bumps from the bead hole. The reamer tips are conical and this tool comes with two reamer tips. You will need 2 AA batteries which are not included.

Beading Needles
These beading needles are made from two pieces of thin wire with a specially designed loop which “collapses” when threading the needle through a bead. The needle is long and therefore you can thread more beads and thread “hollow” beads. Available in various wire thicknesses and lengths.

A Bowl for Beads
This is a practical small bowl for the beads you work with. The triangular shape makes it easy to pour the left over beads into the the bag or container.

A Bead Board
This is a practical solution for designing necklaces before threading the beads onto the wire. The three slots on the table are used for laying out your beads in the right order for your jewellery. When the design is ready, the beads may be threaded onto the wire.

A Jewellery Mat
A beading mat as an underlay  prevents the beads from rolling away, and you also have somewhere to attach the beading needle when not in use. Convenient as an underlay, which also protects the table.

November 28, 2012

Jewellery School - A Bead Caddy Spinner

When threading numerous mini beads onto a beading wire, a bead caddy spinner is a useful and quick tool. Insert a beading wire through the end of a beading needle, spin the bead caddy spinner by turning the lever in the middle and the needle will fill with beads automatically.

1. Cut a piece of beading wire measuring approx. 70cm. Squeeze the beading wire flat at the end so that it can easily go through the eye of the needle.

2. Fill the bead caddy spinner with rocaille beads (preferably lots).

3. Insert the needle into the spinning beads in the opposite direction of the spin.

4. Turn the lever in the middle with your left hand clockwise and hold the needle as shown with the hook to the left and the needle will automatically fill with beads.

5. Push the beads from the needle onto the wire. If a bead is stuck on the needle or wire, crush it with flatnose pliers.

November 20, 2012

Jewellery School - An Adjustable Knot

An adjustable knot is an adjustable fastening for necklaces and bracelets made on leather, polyester and cotton cords without using claps and tools.

1. Arrange the two long ends parallel and tie an adjustable knot in each side . Make a loop with one end of the cord and twist this end around itself and the other cord three to five times.

2. Now push the end of this cord through the loops – also through the first loop.

3. Now pull the end of the cord and the loops will lie flat and tight around the two cords.

4. Cut the end of the cord off close to the knot. Glue it onto the loops. Take care not to glue it onto the cord on which it is intended to slide.

November 15, 2012

Jewellery School - Fashion Mix Bracelets

           
Fashion mix beads in trendy colours are embroidered with black elastic cord in a lovely pattern. The beads are available in a variety of colours so let yourself loose.

1. Cut a piece of elastic cord measuring approx. 60cm. Thread a bead onto the middle of the cord. Thread another two beads onto each end of the cord on either side of the middle bead.

2. Thread another bead through both cord ends from opposite sides.

3. Tighten.

4. Thread another two beads onto each end of the cord on either side of the middle bead. Thread another bead onto through both cord ends Continue like this.

5. Thread one end of the elastic cord through the first bead.

6. Tie tight reef knots to “lock” the knots.

November 14, 2012

Jewellery School - Jewellery on Beading Wire with a Clasp

           
 Beading wire is plastic covered metal wire consisting of several twisted strands. This makes the wire strands flexible and easy to work with. Beading wire is also strong and can carry many beads without loosing its strength or shape.

 Beading wire with many strands is softer and is used for delicate and light beads, whilst beading wire with fewer strands is ideal for large and heavy beads. When the beading wire is filled with beads to the desired length, finish by attaching a clasp.  We have made ​​it easy by putting together ​​a starter kit, which gives you a really good base for quickly getting started with jewellery making on beading wire. Alternatively, you can purchase the components individually.

1. Start by threading a bead tip and a crimp bead onto the wire. Squeeze the crimp bead flat.

2. Cut off the beading wire right after the crimp bead.

3. Close the bead tip around the crimp bead. Thread beads onto the beading wire.

4. Use the same closing procedure at the opposite end. At this end, squeeze the crimp bead flat into the bead tip. Fill the beading with beads but do not make it too tight.

5. Attach the clasp: Insert a round jump ring into the loop of the bead tip and close it with two flat nose pliers. Slightly twist the ends past each other whilst they scrape against each other. Only twist to the side – never apart.

6. When the two ends of the round jump ring are exactly opposite each other, finish twisting.

7. Before closing the round jump ring at the other end, attach a lobster claw clasp.

8. TIPS: A clasp and round jump rings easily add another 2 or 3cm to the length of the necklace. Include this in the desired finished length.

9. Variant: Individual beads on the wire. The beads are held in place with crimp beads. Squeeze the crimp bead flat with crimping pliers. Place the crimp bead and squeeze as shown on each side of the bead.

10. Squeeze the crimp bead flat, forming a curve.

11. Assemble the curve to make a round bead using the outer jaws on the pliers.

November 12, 2012

Jewellery School - Friendship Bracelets

           
The technique is very simple and only requires that you can make a 'forward 4-shape knot'. You can use different kinds of cords and beads, but make sure that the cord fits the size of the bead.

1. Cut a 100cm piece and a 40cm piece of your choosen cord (the more braiding and the less beads, the longer the pieces of cord). Double over the long piece of cord. Make a loop at one end of the small piece of cord. Join the cords with a knot, leaving a small loop. Cut off the short end.

2. Put beads onto the middle cord (i.e. the shortest cord).

3. Put the right hand side cord over the middle cord, back under and up. Pull the cord up through the loop and tighten it whilst keeping the middle cord taut.

4. Repeat with the left hand side cord following the same procedure.

October 24, 2012

Jewellery School - Rings

           
This ring is made completely from scratch with silver-plated wire on a ring stick. A ring can be decorated either by 'sewing' on beads with a thin silver-plated wire or by putting beads onto head pins and attaching them to the ring like little pendants. You may use a ring which is made completely from scratch or one that is already shaped.

1. Measure the appropriate ring size using the ring sizer.

2. The size can be found on the ring stick.

3. Wrap the silver-plated wire tightly around the ring stick at the correct size number.

4. Let the two ends overlap and then wrap the ends around the ring. This now forms the bottom of the ring.

5. Use a new piece of silver-plated wire to wrap along the top of the ring towards the middle and bend it straight upwards. Use another piece of silver-plated wire to wrap along the top of the ring and towards the middle. Wrap the end around the piece which is bent upwards.

6. Put the bead onto the stalk.

7. Use the tip of round nose pliers to twist the wire forming a coil. Nip off the end.

Sew beads onto a ring

1. Fasten the wire in the sieve disc.

2. Thread the beads onto the wire 1 – 2 – 3 at the time whilst “sewing” up and down through the holes of the sieve disc – and around the ring.

Decorate a ring

1. Put small beads onto head pins and bend them a little to one side and cut off leaving approx. 1cm of the head pin.

2. Twist to form a loop which is not to be closed completely. Use round nose pliers.

3. Attach the loop from the headpin onto the loop on the ring. Now close it completely. Attach three pendants to each loop.