Showing posts with label Interior. Show all posts

March 05, 2019

A Hand cast in Plaster in a disposable Glove


This hand is cast in white plaster compound in a disposable latex glove.


1. Pour water into a bucket and sprinkle plaster compound slowly until it forms a peak at the surface of the water. Leave it for about 8 min.


2. Stir well until air bubbles form on the surface. NB: Plaster generates heat during hardening (the larger the quantity, the greater the heat).


3. Pour the mixture into the disposable glove. A TIP: Ask somebody to help you hold the glove whilst pouring to ease the process.


4. Close the glove with a piece of string, tied tightly.


5. Leave the filled glove to dry on top of a round object in order to get a hollow shape. Leave to dry for approx. 1 hour. Cut away the glove.


Another example with other variants


Another example with other variants

August 20, 2013

DIY Eco Bath Rug

DIY Eco Bath Rug

It is quite easy to do: simply cut the size you want your rug be and cut flaps into strips of the same size roughly. This is one of those arts that can be done even by your kids (when it comes to tying, not cutting!). Check out Michelle Kaufmann’s video – she explains and shows step-by-step the whole process, so you can understand every little thing. For bathroom rugs, try using fabrics which are very resistant to washing and which dry very quickly. Anyway, for bathroom or not, ALWAYS avoid fabrics that fray, because your house will be full of lint!

June 20, 2013

A Lantern with a Silhouette Effect made from Lolly Sticks


The square lantern for tealight candles is made from lolly sticks, which are glued together. A piece of transparent paper is attached onto the four sides of the lantern. Wood veneer reindeer are glued onto a halved wooden bead and attached to the base of the lantern, providing a dancing silhoutte when the candle is lit.


1. Arrange four standard size lolly sticks into a square, “balancing” on the thin side. Glue the corners together into a square. Make two squares in total.


2. Glue four sets of lolly sticks (each set consists of two lolly sticks) together at right angles along the long side.


3. Now you have made two squares and four right angled corners.


4. Glue the four right angled corners in place inside each corner of one of the squares.


5. Attach the other square with glue to the right angled corners at the opposite end. Glue two lolly sticks horizontally, and arranged in parallel (the large surface of the lolly stick facing down) onto the outside of one angled corner post to the other angled corner post onto two parallel sides of the lantern.


6. Turn the lantern upside down and make a base from four lolly sticks which are attached with glue on the inside of the lantern against the two lolly sticks which have been glued on on the outside.


7. Attach the wood veneer reindeer to the halved wooden bead. Insert the reindeer's hoof in the hole of the bead. Make four of these.


8. Attach the beads with the reindeer onto the lolly stick base inside the lantern. Use glue.


9. Measure and cut four pieces of transparent paper that fit the lantern's squared format and glue the paper onto the four sides inside the lantern along the vertical angled corner posts.


example

May 30, 2013

A Japanese Lantern made from Lolly Stick Slats


This Japanese inspired square lantern for tealights is made  with staggered slats made from lolly sticks which are glued together. The inside of the lantern is lines with transparent paper which creates a soft light when the lantern is lit.


1. Arrange two long lolly sticks  parallel 8cm apart. Apply a blob of glue at each end of both lolly sticks.


2. Attach a standard size lolly sticks across the top of the two long lolly sticks.


3. Place another standard size lolly stick next to the glued-on lolly stick. This is used for measuring the distance to the next standard size lolly stick. There should be the width of a lolly stick between each glued-on lolly stick. Continue this process and attach every other lolly stick with glue all the way along the long lolly sticks.


4. Remove all the lolly sticks that have not been glued on and a slatted pattern appears. NB: make four sides for the lantern by following the procedure described in paragraph 1-3, making two sides with nine lolly sticks across and two sides with ten lolly sticks across. The slats can then be connected into a square when assembling the lantern.


5. NB: Gluing the two sides with ten lolly sticks will start one lolly stick width further down than the sides with nine lolly sticks.


6. Measure the four sides of the lantern and draw the measurements onto a piece of transparent paper. Cut out. Apply a blob of glue in each of the four corners on the four sides.


7. Attach the transparent paper onto all four sides.


8. Assemble the four sides of the lantern with glue by connecting the slats of each of the four sides into a square.

April 26, 2013

Chemistry Test Tubes Chandelier

Maria S.C. lamp is made from reused chemistry test tubes. The lamp is inspired by Maria Sklodowska-Curie, the Polish scientific woman, awarded the Nobel Prize in Chemistry for the discovery of polonium and radium. The tubes are detachable and the lamp provides the opportunity for visual experiment by creating a variety of configurations and arrangements.


Suspended Lamp Made Out of Recycled Graters

What a great idea to use old graters as lampshades for this light rack ! One of our favorite creation we’ve seen with recycled graters !


April 12, 2013

DIY Lighted Natural Wall Art

DIY Lighted Natural Wall Art

Here is a really cool DIY wall art idea that you might like. A canvas with lighted branches and moss is perfect way to bring some nature and light into your interior. To make such canvas besides lighted branches you’ll need a bundle of sticks, a bag of moss, green canvas paint, canvas molding paste, paste spatula, a paint brush, E6000 glue and a staple gun.

Instructions

Mix molding paste with green paint and apply the mixture to the canvas. Let the paste dry overnight and apply some green paint. When it dries, glue lighted branches and sticks. Next, glue moss to cover the cords and hang up your new wall art when glue is dry.

DIY monochrome clock


Today I have another really simple diy for you. First you cut a circle in an old shoebox, and divide it into 12 pieces. Instead of using numbers, I used all the I:s from my foam letters pad. Then you attach the hands and the clockwork, as the instructions says, and paint the whole thing gray. (if you want it to look the same as the one I did). All for the cost of 11 euros, or 15 dollars.

March 19, 2013

Screen Stencil Prints in Embroidery Frames


The motifs in the embroidery frames are made with textil color fabric paint and screen stencils on tea towels.


1. Place the screen stencil onto the tea towel with the adhesive side face down.


2. Saturate the paint roller with textil color fabric paint. Roll the paint roller onto and over the screen stencil and a print will appear on the tea towel.


3. Remove and wash the screen stencil in lukewarm water immediately. Let the screen stencil print dry for the recommended time stated on the textil color packaging. Then fix the motif with a hot iron on the setting required for cotton (this is normally written on the iron).


4. Draw a circle, approx. 22 cm in diameter with the motif in the center and trim the circle. You may use a pair of compasses.


5. Place the circle with the motif onto the inner ring of the embroidery frame. Press the outer ring down over the inner ring and tighten the tension screw.


6. Trim the edge – all the way around – and hang the embroidery frame using a piece of embroidery yarn.

March 18, 2013

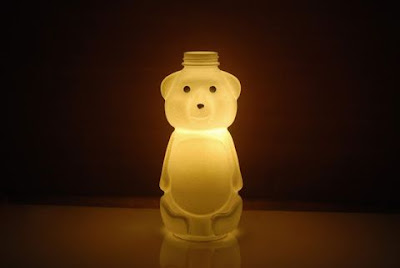
Honey Bear Bottle Lamp

Remember those honey bear bottles that you use during breakfast? I'm going to show you how you can upcycle your bottles into night lamps.


You will need an empty and cleaned honey bear bottle, lightbulb and chord for lightbulb which you can buy at the home depot. My light bulb is a 5 watt warm white compact fluorescent light.


Next cut the bottom part of the bottle using an exacto knife or a plain cutter. The type of plastic is a little harder than the usual PET water bottle so be patient with cutting and be careful not to hurt yourself. I kind of stabbed myself in the hand but it's nothing serious.


Spray 3 coats of white spray paint on the bottle and let it dry. Once it's dry, then place the lightbulb underneath the bottle.


And here's the final product! You can use it as a night lamp for a child's bedroom.


It won't really melt the plastic bottle. I have observed it for a few hours and so far the plastic did not feel warm. The cap portion is open anyway so there's enough space for the warm air to escape.


What do you think? :)